FastDFS的搭建和相关使用

1.简介

FastDFS是一个开源的高性能分布式文件系统。它的主要功能包括:文件存储,文件同步和文件访问(文件上传和文件下载),它可以解决高容量和负载平衡问题。 FastDFS应该满足基于照片共享站点和视频共享站点等文件的网站的要求。

– 引用自相关GITHUB项目

源GIT项目地址:
1
https://github.com/happyfish100/fastdfs

2.fastDfs的搭建

操作环境:CentOS7 X64,以下操作都是单机环境。

服务列表:

hostname ip Node Type username
m1 192.168.142.128 tracker server,storage server root
m2 192.168.142.134 tracker server,storage server root
①安装libfastcommon

获取libfastcommon安装包:

1
wget https://github.com/happyfish100/libfastcommon/archive/V1.0.38.tar.gz

解压安装包:

1
tar -zxvf V1.0.38.tar.gz

进入目录:

1
cd libfastcommon-1.0.38

执行编译:

1
1
./make.sh

安装:

1
1
./make.sh install
②安装FastDFS

获取fdfs安装包:

1
wget https://github.com/happyfish100/fastdfs/archive/V5.11.tar.gz

解压安装包:

1
tar -zxvf V5.11.tar.gz

进入目录:

1
cd fastdfs-5.11

执行编译:

1
1
./make.sh

安装:

1
1
./make.sh install

查看可执行命令:

1
ls -la /usr/bin/fdfs*
③配置Tracker服务
  1. 进入/etc/fdfs目录,有三个.sample后缀的文件(自动生成的fdfs模板配置文件),通过cp命令拷贝tracker.conf.sample,删除.sample后缀作为正式文件:

    1
    2
    3
    4
    cd /etc/fdfs/
       
    cp tracker.conf.sample tracker.conf  
       
    
  2. 编辑tracker.conf:vi tracker.conf,修改相关参数

    1
    2
    3
    base_path=/data/log/fastdfs/tracker  #tracker存储data和log的跟路径,必须提前创建好
    port=22122 #tracker默认22122
    http.server_port=80 #http端口,需要和nginx相同
    
  3. 启动tracker(支持start stop restart):
    1
    /usr/bin/fdfs_trackerd /etc/fdfs/tracker.conf start
    
  4. 查看tracker启动日志:进入刚刚指定的base_path(/data/log/fastdfs/tracker)中有个logs目录,查看tracker.log文件

    1
     tail -200f /data/log/fastdfs/tracker/logs/trackerd.log![J5BqaR.png](https://s1.ax1x.com/2020/04/28/J5BqaR.png)
    

    J5BqaR.png

  5. 查看端口情况:netstat -apn grep fdfs

J5BVu4.png

④配置Storage服务
  1. 进入/etc/fdfs目录,有cp命令拷贝storage.conf.sample,删除.sample后缀作为正式文件;

    1
    2
    3
    4
    cd /etc/fdfs/
       
    cp storage.conf.sample storage.conf
       
    
  2. 编辑storage.conf:vi storage.conf,修改相关参数:

    1
    2
    3
    4
    5
    6
    base_path=/data/log/fastdfs/storage   #storage存储data和log的跟路径,必须提前创建好
    port=23000  #storge默认23000,同一个组的storage端口号必须一致
    group_name=group1  #默认组名,根据实际情况修改
    store_path_count=1  #存储路径个数,需要和store_path个数匹配
    store_path0=/data/log/fastdfs/storage  #如果为空,则使用base_path
    tracker_server=192.168.142.128:22122 #配置该storage监听的tracker的ip和port
    
  3. 启动storage(支持start stop restart):
    1
    2
    3
    4
    /usr/bin/fdfs_storaged /etc/fdfs/storage.conf start
       
    // 如果现实文件夹不存在 则使用下面命令新建
    mkdir -p /data/log/fastdfs/storage
    
  4. 查看storage启动日志:进入刚刚指定的base_path(/data/log/fastdfs/storage)中有个logs目录,查看storage.log文件

    1
    tail -200f /data/log/fastdfs/storage/logs/storaged.log 
    

5.此时再查看tracker日志:发现已经开始选举,并且作为唯一的一个tracker,被选举为leader

6.查看端口情况:

1
netstat -apn|grep fdfs

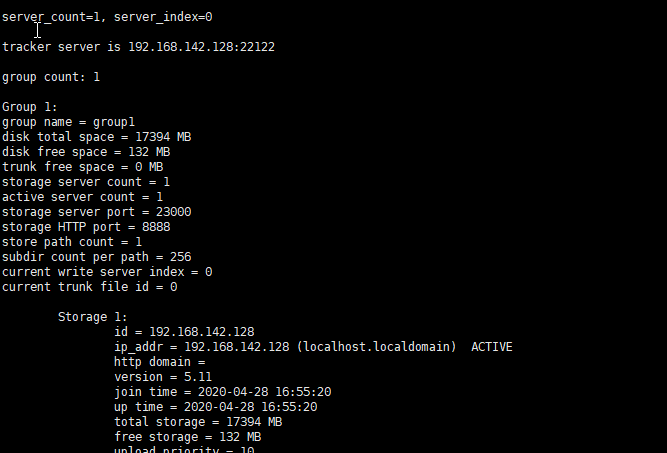
7.通过monitor来查看storage是否成功绑定:

1
/usr/bin/fdfs_monitor /etc/fdfs/storage.conf

J5ygyT.png

⑤安装Nginx和fastdfs-nginx-module模块
  1. 下载Nginx安装包

    1
    wget http://nginx.org/download/nginx-1.15.2.tar.gz
    
  2. 下载fastdfs-nginx-module安装包

    1
    wget https://github.com/happyfish100/fastdfs-nginx-module/archive/V1.20.tar.gz
    
  3. 解压nginx:

    1
    tar -zxvf nginx-1.15.2.tar.gz
    
  4. 解压fastdfs-nginx-module:

    1
    tar -xvf V1.20.tar.gz
    
  5. 进入nginx目录:

    1
    cd nginx-1.15.2
    
  6. 安装依赖的库

    1
    2
    3
    4
    5
    6
    7
    8
    9
    10
    11
    12
    // 命令找不到请先安装gcc
    yum -y install gcc
           
    // centos请使用如下命令
    yum update
    yum install libpcre3 libpcre3-dev openssl libssl-dev libperl-dev
           
    // ubuntu使用如下命令
    apt-get update
    apt-get install libpcre3 libpcre3-dev openssl libssl-dev libperl-dev


  7. 配置,并加载fastdfs-nginx-module模块:

    1
    ./configure --prefix=/usr/local/nginx --add-module=/usr/local/src/fastdfs-nginx-module-1.20/src/
    
  8. 编译安装:

    1
    2
    make
    make install
    
  9. 查看安装路径:

    1
    whereis nginx
    

    J5coM6.png

  10. 启动、停止:

    1
    2
    3
    4
    5
    cd /usr/local/nginx/sbin/
    ./nginx 
    ./nginx -s stop #此方式相当于先查出nginx进程id再使用kill命令强制杀掉进程
    ./nginx -s quit #此方式停止步骤是待nginx进程处理任务完毕进行停止
    ./nginx -s reload
    
  11. 验证启动状态:

    1
    wget "http://127.0.0.1"
    

    J5gEJs.png

  12. 查看此时的nginx版本:发现fastdfs模块已经安装好了

⑥配置Nginx和fastdfs-nginx-module模块
  1. 配置mod-fastdfs.conf,并拷贝到/etc/fdfs文件目录下

    1
    2
    3
    cd /data/fastdfs
    cd fastdfs-nginx-module-1.20/src/
    cp mod_fastdfs.conf /etc/fdfs
    
  2. 进入/etc/fdfs修改mod-fastdfs.conf:

    1
    2
    3
    4
    5
    6
    base_path=/data/log/fastdfs
    tracker_server=192.168.142.128:22122 #tracker的地址
    url_have_group_name=true #url是否包含group名称
    storage_server_port=23000 #需要和storage配置的相同
    store_path_count=1  #存储路径个数,需要和store_path个数匹配
    store_path0=/data/fastdfs/storage #文件存储的位置
    
  3. 配置nginx,80端口server增加location如图:

    1
    2
    cd /usr/local/nginx/conf/
    vim nginx.conf
    
    1
    2
    3
    4
    location ~/group[0-9]/ {
                root   /data/fastdfs/storage;
                ngx_fastdfs_module;
            }
    
  4. 最后需要拷贝fastdfs解压目录中的http.conf和mime.types:

    1
    2
    cd /data/fastdfs/fastdfs-5.11/conf
    cp mime.types http.conf /etc/fdfs/
    

5.刷新nginx

1
2
cd /usr/local/nginx/sbin 
./nginx -s reload
⑦相关问题
1
返回错误码28表示磁盘空间不足注意FastDFS中有预留空间的概念在tracker.conf中设置配置项为reserved_storage_space缺省值为4GB即预留4GB的空间请酌情设置reserved_storage_space这个参数比如可以设置为磁盘总空间的20%左右

6.相关SpringBoot的Demo

maven依赖:
1
2
3
4
5
6
7
8
9
10
11
12
13
14
15
16
17
18
19
20
21
22
23
24
25
26
27
28
29
30
31
32
33
34
35
36
37
38
39
40
41
42
43
44
45
46
47
48
49
50
51
52
53
54
55
56
<dependency>
            <groupId>commons-io</groupId>
            <artifactId>commons-io</artifactId>
            <version>2.6</version>
        </dependency>

        <dependency>
            <groupId>org.apache.commons</groupId>
            <artifactId>commons-lang3</artifactId>
            <version>3.4</version>
        </dependency>


        <dependency>
            <groupId>commons-beanutils</groupId>
            <artifactId>commons-beanutils</artifactId>
            <version>1.9.3</version>
        </dependency>

        <dependency>
            <groupId>com.github.tobato</groupId>
            <artifactId>fastdfs-client</artifactId>
            <version>1.26.5</version>
            <exclusions>
                <exclusion>
                    <artifactId>logback-classic</artifactId>
                    <groupId>ch.qos.logback</groupId>
                </exclusion>
                <exclusion>
                    <artifactId>commons-io</artifactId>
                    <groupId>commons-io</groupId>
                </exclusion>
                <exclusion>
                    <artifactId>commons-beanutils</artifactId>
                    <groupId>commons-beanutils</groupId>
                </exclusion>
            </exclusions>
        </dependency>


        <dependency>
            <groupId>org.springframework.boot</groupId>
            <artifactId>spring-boot-starter-web</artifactId>
        </dependency>

        <dependency>
            <groupId>org.springframework.boot</groupId>
            <artifactId>spring-boot-starter-test</artifactId>
            <scope>test</scope>
            <exclusions>
                <exclusion>
                    <groupId>org.junit.vintage</groupId>
                    <artifactId>junit-vintage-engine</artifactId>
                </exclusion>
            </exclusions>
        </dependency>
application.properties:
1
2
3
4
5
6
7
#fastdfs配置
fastdfs.file.url=http://192.168.142.128/
fdfs.soTimeout=150000
fdfs.connectTimeout=60000
fdfs.thumbImage.width=150
fdfs.thumbImage.height=150
fdfs.trackerList[0]=192.168.142.128:22122
FastdfsDemoApplication:
1
2
3
4
5
6
7
8
9
10
@SpringBootApplication
//@Import(FdfsClientConfig.class) //使用配置中心
public class FastdfsDemoApplication {

    public static void main(String[] args) {
        SpringApplication.run(FastdfsDemoApplication.class, args);
    }

}

FastDFSClient:
1
2
3
4
5
6
7
8
9
10
11
12
13
14
15
16
17
18
19
20
21
22
23
24
25
26
27
28
29
30
31
32
33
34
35
36
37
38
39
40
41
42
43
44
45
46
47
48
49
50
51
52
53
54
55
56
57
58
59
60
61
62
63
64
65
66
67
68
69
70
71
72
73
74
75
76
77
78
79
80
81
82
83
84
85
86
87
88
89
90
91
92
93
94
95
96
97
98
99
100
101
102
103
104
105
106
107
108
@Repository
@Slf4j
public class FastDFSClient {


    @Autowired
    private FastFileStorageClient storageClient;

    @Value("${fastdfs.file.url}")
    private String fastdfsFileUrl;

    /**
     * 上传文件
     *
     * @param file 文件对象
     * @return 文件访问地址
     * @throws IOException
     */
    public String uploadMultipartFile(MultipartFile file) {
        InputStream inputStream =null;
        try {
            inputStream = file.getInputStream();
            StorePath storePath = storageClient.uploadFile(inputStream, file.getSize(), FilenameUtils.getExtension(file.getOriginalFilename()), null);
            return getResAccessUrl(storePath);
        } catch (IOException e) {
            log.error("uploadMultipartFile error",e);
            return null;
        } finally {
            if (inputStream!=null){
                try {
                    inputStream.close();
                } catch (IOException e) {
                }
            }
        }
    }

    
    public String uploadFile(File file) {
        FileInputStream fileInputStream =null;
        try {
            fileInputStream = new FileInputStream(file);
            StorePath storePath = storageClient.uploadFile(fileInputStream, file.length(), FilenameUtils.getExtension(file.getName()), null);
            return getResAccessUrl(storePath);
        } catch (FileNotFoundException e) {
            log.error("uploadFile error",e);
            return null;
        } finally {
            if (fileInputStream!=null){
                try {
                    fileInputStream.close();
                } catch (IOException e) {
                }
            }
        }
    }

    /**
     * 将一段字符串生成一个文件上传
     *
     * @param content       文件内容
     * @param fileExtension
     * @return
     */
    public String uploadStringFile(String content, String fileExtension) {
        ByteArrayInputStream stream =null;
        try {
            byte[] buff = content.getBytes(Charset.forName("UTF-8"));
            stream = new ByteArrayInputStream(buff);
            StorePath storePath = storageClient.uploadFile(stream, buff.length, fileExtension, null);
            return getResAccessUrl(storePath);
        } catch (Exception e) {
            log.error("uploadStringFile error",e);
            return null;
        } finally {
            if (stream!=null){
                try {
                    stream.close();
                } catch (IOException e) {
                }
            }
        }
    }

    private String getResAccessUrl(StorePath storePath) {
        String fileUrl = fastdfsFileUrl + storePath.getFullPath();
        return fileUrl;
    }

    /**
     * 删除文件
     *
     * @param fileUrl 文件访问地址
     * @return
     */
    public void deleteFile(String fileUrl) {
        if (StringUtils.isEmpty(fileUrl)) {
            return;
        }
        try {
            StorePath storePath = StorePath.parseFromUrl(fileUrl);
            storageClient.deleteFile(storePath.getGroup(), storePath.getPath());
        } catch (FdfsUnsupportStorePathException e) {
            log.warn(e.getMessage());
        }
    }

}
TestDfsController:
1
2
3
4
5
6
7
8
9
10
11
12
13
14
15
16
/**
 * 相关的测试类
 */
@RestController
public class TestDfsController {

    @Autowired
    private FastDFSClient fastDFSClient;

    @RequestMapping("/test")
    public void testUpload() {
        File file = new File("C:\Users\admin\Desktop\test.txt");
        String path = fastDFSClient.uploadFile(file);
        System.out.println(path);
    }
}
城南少年与猫 wechat
欢迎您扫一扫订阅我的微信公众号!
0%